
- Setting colors in Windows SAS
- Saving Window sizes and positions in Windows SAS
- Creating a Customized Tool Bar
- How can I get the TAB to work in SAS 6.11?
- Is it possible to use SAS in UNIX?
Setting Colors in SAS for Windows
Some people find it much easier to work in SAS when the windows are different colors. Starting with SAS 6.10, all windows were white by default. SAS, however, realized you might want to change this back to the old color scheme used in earlier versions. Using the open file dialog, go to the directory SAS/CORE/SASMACRO and open the file dm608clr.sas. This program resets colors to those of SAS 6.08. Go to the very end of the program and add: %DM608CLR; RUN; . Then submit this and sit back and watch the show. What you are seeing is SAS going through every window and setting its color. If you feel adventurous you might try looking through the program and modifying some of the colors to your particular preferences. Once SAS is done, go the the options menu and choose SAVE SETTINGS NOW. SAS should use these colors from now on or until you run the color program again.
Return to TOP; SAS Page; Home Page
Setting Window Size and Position
As with color schemes, some people like to customize where SAS puts its different windows. This is quite easy. Simply use the mouse to drag and resize the windows to your liking and then use the options menu to choose SAVE SETTINGS NOW. Keep in mind that if you change screen resolutions on your PC, say from VGA to SVGA, you will need to repeat this step when you restart SAS. Also, other people prefer to call up SAS windows with a button and should use the Tool Bar.
Return to TOP; SAS Page; Home Page
Creating a Customized Tool Bar
The Tool Bar is one of the most powerful features in SAS for Windows. It allows you to give commonly used commands to SAS with a simple button click. Although SAS comes with a default Tool Bar, you might like to add your own stuff to it. To get the default tools, go the the option menu and choose preferences. From there select either Tool Bar or Toolbox (the tool box works like the Tool Bar, but is a separate window that can be moved around the screen) and push the save button. You should now see the Tool Bar at the top of the screen.
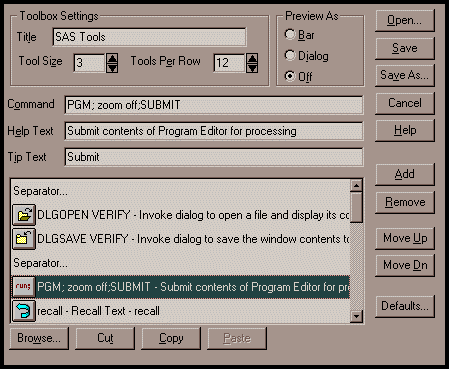 To modify the Tools, go back to the options menu and choose Edit Tools (Wow!). This opens a dialog box with many options. To modify a tool, use the lower right scroll bar to select the tool of interest. In this example, I've chosen the run tool. When it is selected the top portion of the dialog box fills in with commands and descriptions. Here the command for the button has three parts. First I have PGM;. This tells SAS to go to the program editor window. Next I have zoom off;. This "unmaximizes the editor window in case I have it full size. Last is SUBMIT; which runs whatever code is in the editor. I have also selected an icon different from the SAS default. This was changed using the browse button at the bottom of the dialog box which gives several icons provided by SAS. Notice also that there are CUT, COPY and PASTE buttons there so you can move icons from tool to tool or create your own in a paint program to paste into SAS! Other functions on the dialog allow for tool deletion, insertion, separators, and tool order. The top of the dialog controls the number of tools and thier size. I would suggest as common button commands: SUBMIT, RECALL, and CLEAR. For those of you who use overlayed windows you might also try PGM, LIST, and LOG for calling up the windows: Program Editor, Output, and Sas Log, respectively. Once you have your tools just right, choose the save button to keep the changes. Keep in mind you can make very specialized buttons. For example, you could have a button that says "PGM; INCLUDE 'C:\MYDATA\PROGRAM.SAS; SUBMIT; LIST; FILE 'C:\MYDATA\PROGRAM.OUT;". This would get your sas program PROGRAM.SAS, run it, and then save the output in PROGRAM.OUT.
Return to TOP; SAS Page; Home Page
Where is the TAB is 6.11?!
By some small oversight, SAS left the TAB key out of the program editor, making nice looking indented programs a pain to create. You can get it back though. In the program editor (or any text editor) open the file SAS/config.sas . This is the configuration file for SAS (go figure!). At the very top add this line exactly as it is here: -$tabnopbmenu. This will turn on the TAB in the editor. Sorry, I haven't found a way to set the TABs in SAS yet!
Return to TOP; SAS Page; Home Page
UNIX and SAS
In the old days, we ran SAS on the CMS system here on campus. CMS has since reached a slow death and been replaced by UNIX. So, if you have very large datasets or programs to run, you need to do it in UNIX. SAS is available on this operating system, but only on the machined named buzzard. To access it you will need to use TELNET to log into buzzard.csrv.uidaho.edu. To move data files and existing programs to and from UNIX, use a FTP program (Some WEB browsers can do this also). You must have a UNIX account and if dialing in off campus you also need a PPP account. If you have questions regarding UNIX or these accounts please connect to Computer Services or email them. Once you are in UNIX use the editor PICO to create and save your program and then run SAS using the format : SAS program .
SAS will then run and create files program.listing and program.saslog. This is similar to the old CMS system.
UNIX and Windows
If you are uncomfortable with command line UNIX, you might like to try it using a windowing system called XWindows. This is a program which runs on the UNIX machine and provides a windowing environment for programs including SAS. In order to use this, you should be using a computer with direct access to the campus backbone (sorry dialins would be too slow) and a program XWIN32 which is available from computer services for a small fee. SAS under this system is very similar to SAS for Windows on the PC, but due to the load on the campus UNIX machines, the response time may be very slow.
Moving datasets between PCs and UNIX
A common problem when using UNIX is getting your SAS datasets to and from UNIX. Note that I am referring to permanent binary SAS datasets here, not data files which are ascii (use FTP for those). Let's start on the PC end. You want to move the dataset data1.sd2 to UNIX. On the PC run a program like this:
				libname old 'c:\mydata\data1.sd2';
				libname trans xport 'c:\unix\xprt.dat';

				proc copy in=old out=trans memtype=data;
				run;
What this does is create a pointer to the dataset called old and a pointer to a new file called xprt.dat. This new file is a transfer data file which PROC COPY then makes. Move the file to UNIX using FTP (note it is a binary file). Once in UNIX run a program similar to this:
				libname new '/users/myaccount';
				libname trans xport '/users/myaccount/xprt.dat';

				proc copy in=trans out=new memtype=data;
				run;
As you can see, this just reverses the process on the UNIX end. To move files the other direction, use an analogous procedure.
Return to TOP; SAS Page; Home Page